As I discussed yesterday in my post here, Step 1 in my road to scrapbooking success in 2012 has been to create myself a dedicated space for my scrapbooking. I have not spent a cent to create this area, I just got a little creative with what I already had!
I knew that I wanted my scrapbooking area to be in the main living area of the house, as I have had a table set up in a spare room for most of 2011, and never once used it, because I don't like being tucked away in a room while my hubby is out in the living area!
Our dining room has proven to be the perfect design for this, because it has a little recessed area, obviously meant for a buffet or china cabinet. Until this week, we had our lovely buffet there, but I knew this just wasn't going to work for me.
What I really needed was a desk to work at. I have been looking around for a good 6 months for the perfect desk for this little space, but so far, I haven't found 'the one'. So, knowing that I had to make use of something that I already had in the house, I used my powers of persuasion to get our buffet swapped to the front entry of the house, and the entry table from there moved to the little nook in the dining room! I just added one of our extra chairs (when we bought the dining room suite, we bought 2 extra chairs, so that if we have 8 for dinner, we all have matching chairs! It can be a bit tight, but we make do ;) The buffet is great at the entry-way (and my New Year display).
And the entry table is a perfect fit in the dining room. And everything still matches in the dining room, as we bought a complete furniture suite when we furnished the house, so it is all coordinated - bonus!!
Now, the area is really quite tiny, so I had to be creative with how I set it up. I have oodles of scrapbooking supplies, which were given to me by my lovely Aunty Pia, but I know that the majority of these need to stay in my spare room, as they just won't fit out here. Organising all of those bits is a whole other project in itself, which I will save for later this year ;) For now, I have been strong and brought out only 1 Project Life kit, my stash of cardstock and the tools I will need for 'basic' scrapping. Remember, I am keeping it simple in order to get it done! The more stuff out here, the more mess I make, then the less room I have to work on my layouts, and then the more likely I am to ditch the entire project!! I hate looking at mess, so I am quite likely to pick up the whole table and dump it in the spare room so I don't have to look at it, if it becomes an eye-sore ;)
So, now we have a table, let's take a peek at what is on the desk...
I have a clear mat (see it here - from Ikea) to protect the table. It may well go back to being the entry table one day, so I need to ensure that I look after the surface.
My Projects book - this is where I record the details of my projects for things such as my scrapbooking, blogging, entertaining, crafts, etc. I will blog about this wonderful book in itself another day.
My Fiskars paper trimmer - I love this baby!
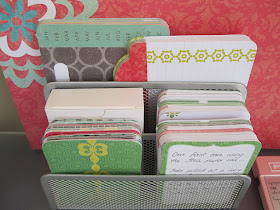
My desk organiser (that I stole out of my study), to store all of my PL cards and paper. I love that it all fits perfectly! And I love that it is all out and ready to use - I am much more likely to use it this way!
This is where everything is:
Front row - (left) journalling filler cards, (right) completed journal cards + blank amber edition journalling cards
Middle row - (left) plain journalling cards, (right) more amber edition journalling cards
Back row - (left) title cards, (right) bi-fold journalling cards, (back) amber edition cardstock
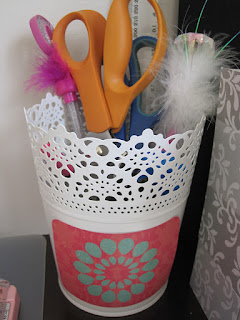
My lovely tin (again from Ikea - you can see it here) to hold pens (including erasable ones for my journalling - read more about them here), scissors, glue, etc. I embellished it quite simply with a PL filler card.
A set of 3 drawers (from my lovely aunty), which I embellished with some silver and white cardstock to make it look a bit pretty!
Drawer 1 - Cardstock and 12x12 scrapping paper
Drawer 2 - Photo pocket pages (I have added dividers to seperate the different types)
Drawer 3 - General 'stuff' - tape, a few of my favourite embellishments, brochures/notes/etc to include in the layouts
And on top of the drawers I have - boxes of excess PL cards and stickers, a Lamp (relocated off of the old scrapbooking table) and my Amber Project Life binder stands at the back, out of the way, leaving the working mat free to work on layouts.
The big white Project Life box sits on the floor, with excess bits and pieces.
Cross your fingers that this set up works for me!!


That looks just gorgeous. What a thoroughly charming space.
ReplyDeleteLove it. It doesn't seem to matter where I try to create a nook the kids just take over. arrhhh.
ReplyDeleteGood luck with pl2012. I did it last year but only want to do it every few years, not all the time. It does take an organised person.
Thanks ladies! I love my little space too :)
ReplyDelete