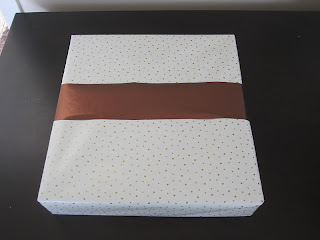
I found this lovely wrapping paper - white with gold polka dots. I also bought some plain gold to compliment it. And I also already had this brown from a few years back - it is so hard to find brown wrapping paper, so I have to be creative with how I use the limited supply that I have!
First I wrapped the presents in the paper that is white with gold spots.
Then I added a brown belly band. I used my husband's square to measure the lines on the brown paper, so that every one was the same width. I contemplated doing different widths for the different sized gifts, but decided to stick with one size.
Finally, my gifts needed a tag. I had seen 'initial' gift tags when I went searching for inspiration online, and love their boldness. They are simple, yet so personal, and also make a lovely addition to the overall effect of the gift. So, I created a template, and printed off all of the initials that I needed. I then mounted them onto a coloured background, to create a layered effect.
For the larger presents, I glued a small white doily onto the gold paper and cut around the edges. Then I cut around the initial tag circle with normal scissors, keeping the lines clean.
For the rest of the gifts, I cut a gold circle using pinking shears. I traced around the base of a glass to ensure that the circles were all the same size too. And for the tags for the gold circles, I cut them using pinking shears, to keep in with the zig-zag effect.
I mounted all of the initials onto the backings using thick double sided tape, so that it added a little height and dimension to the overall look.
The added bonus of the initial gift tags is Mick can't see which presents are for him... There are two Mums, my niece Macy and my friend Melinda too!! Lots of M's under the tree - he has no chance of knowing which ones are for him ;)
For a few of the gifts, I then added this gorgeous brown and gold ribbon. It is so sparkly! But I only had one roll left from last Christmas, and I didn't want to give myself the stress of trying to find it again this year! So, I just settled for a few gifts having the sparkles.
So, that is the story of my gift wrapping for Christmas in 2011. I found this to be an easy process, although it was a little time consuming, but I am thrilled with the overall effect of the gift wrapping! I contemplated all sorts of lovely creative paper bows and flowers for the tops, but I decided to keep it flat, so that it is easier to both stack under the tree, and also to transport when gifts are delivered.


0 comments:
Post a Comment