
If you have been following along with my Finishing Off Friday posts, you will have seen the recent progress that we made on the room, in order to get it completed. If not, I have plenty of pictures to share with you today!

Last year after I pulled my old study apart, I enrolled in an online course with Simplify 101 called 'Organise Your Creative Workspace'. This was such a wonderful investment of my time and money, as it really helped me to think about all of the little elements that I wanted to include in my new study in order to make it as functional as possible. I highly recommend this course to anyone who has oodles of 'stuff' to get organised, as Aby helps you to break down everything that you want to fit into the space, and then select storage solutions that best suit those items. And, not to forget, making your actual work surface functional is really important too - if you want to work and/or create in there, you need a work surface that is the right size and shape for your needs. There is so much to consider, and I loved the way that the course broke it all down into manageable pieces for me to work out!
This is the photo looking into the room from the doorway.

To the left of the door is a big built-in wardrobe.

I organised this using big plastic tubs, which you can read about here. The bottom tubs store all of my teaching supplies (games, activities, crafts, etc), and the top tubs store business files and personal archives.

On the inside of the left-hand door I have my wrapping station. Read about that here.

On the inside of the other door, I plan to hang a peg-board for storing craft supplies like scissors and paint tubes someday soon.
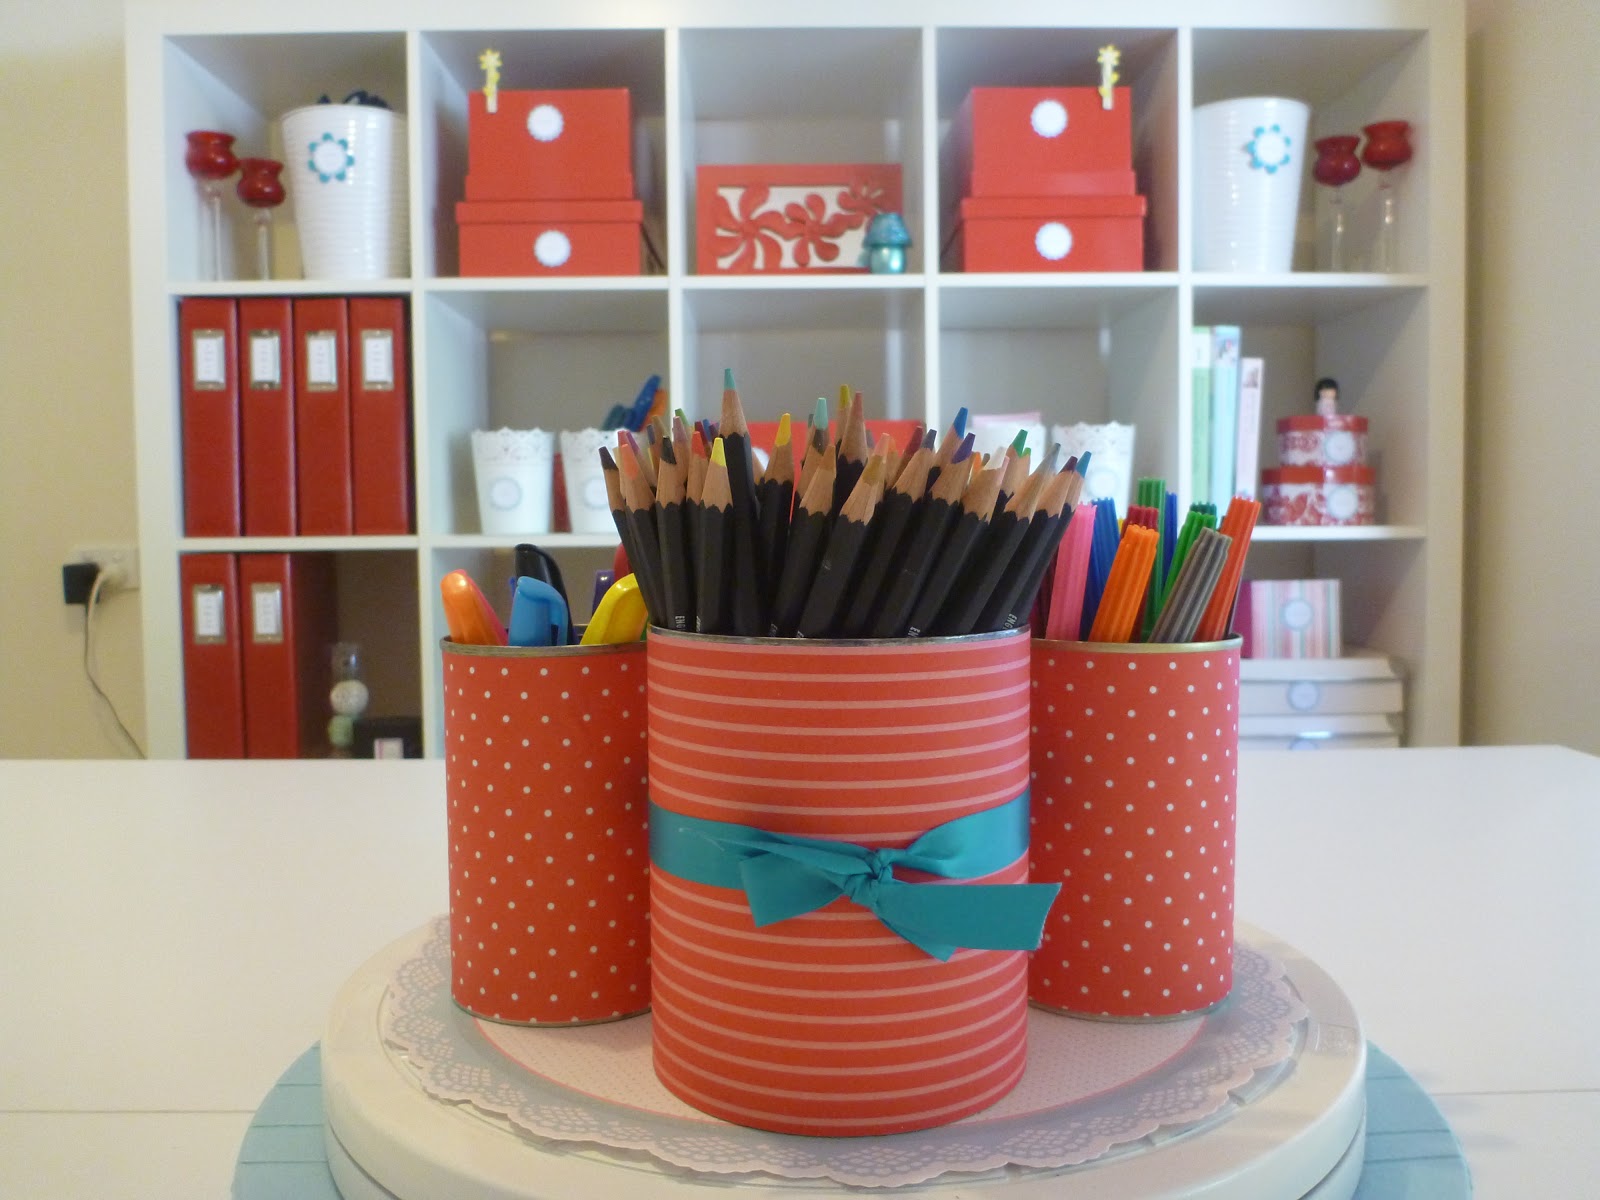
On the back wall of the room, I have a 5x5 Expedit unit from Ikea. This houses most of the stationery, office supplies, crafting tools and supplies, photo albums and memorabilia that I have. You can read a more detailed account of what is in this wall unit here.

In the middle of the room, I have my amazing workbench!

My husband made it for me, using two cube units and two benchtops, and a whole lot of love!! You can read about how we made it here.

The only thing I have on top of the workbench is a lazy susan with my pencil cups. I simply covered some tins with cardstock to make these cute pencil cups, and I spray painted an old TV turntable for the lazy susan. I have put out coloured pencils, marking pens and highlighters, for easy access during my project work. I didn't really want anything else on top of the bench, I prefer it being clear, which allows me more space to spread out.
I decided not to have a desk in my new study, as we haven't really used a desk since we got laptops. We do our browsing on the laptop in the lounge room, and I sit at the dining table when I do Mick's business work, and when I do my Wednesday 'desk jobs'. We just take the laptop into the study and plug it in if we need to print, but I know our next printer will be wireless anyway. So, I decided that I would rather dedicate the space to a big workbench (which I can always sit at and use as a desk if I had to), which allows me to spread right out when doing scrapbooking layouts, and also provides an awesome cutting surface for sewing projects. I have also found it to be a really great space for wrapping presents!
I have a little bar stool that I can sit at when working at the workbench - I re-covered a spare stool that we had in the garage.

On the right hand wall, as you walk into the room, I have my two filing cabinets. They are the old filing cabinets that we had in here from my 'old' study, I know they are brown and the rest of the furniture is white, but I am not really concerned about replacing them at the moment - one day it will all be colour coordinated!

The filing cabinet on the left holds my scrapbooking cardstock and photo pocket pages. Read more about how that is organised here.

And the filing cabinet on the right has two rows of hanging files - one for our personal files and one for business records.

On top of the left filing cabinet I have my printer.

And on the right side one, I have a drawer unit, some stationery and current projects like my maternity journal and my soon-to-be-used Baby Milestone Cards.


I use this three-drawer unit to store items for my current photo album projects. I have one drawer for my family album, one for the baby's album, and one for 'other' projects that are on the go (like my maternity journal, a travel journal, or photos I am going back to fix up). I pop memorabilia, notes, journalling, photos, coordinating cardstock, etc into these drawers, and when I am working on an album I take the drawer out and use the bits and pieces that I have been collecting in the recent weeks. It is a great way to store these random bits and pieces until I am ready to use them. And it ensures that I remember to include it in my albums.

We installed a ceiling fan with a double light in the room, so that I have a lovely cool workspace, which is extremely well-lit for project work. This is so important for a room of crafting fun!

The walls are still quite a blank canvas. I have my birthday calendar on one wall:

And my Martha Stewart hanging pocket on another.

The big wall above the printer will eventually house a pinboard/magnetic board - when I find the right one! I would love to create an inspiration board, and a place to hang my new layouts here. And I know this wall would also be perfect for a 4x4 Expedit down the track, if we decide that we need more storage space in here!

And that is about it! I love the feel of this room, and doing projects in here has just been a dream since having it all set up. It is super easy to work on the big bench space. The work surface is flat, durable and so large! And I love that it is at standing height, so I don't get a sore back from constantly leaning down. I tend to stand up when I am doing project work, so a bench-height desk is perfect for my needs. And not to mention, packing up after a project is finished is nice and easy too, given that every single item in the room has a special home, which is easy to be returned to.
My big tip on creating your dream workspace is to make it personalised to what YOU need. There are so many wonderful ideas out there online of dreamy workspaces, but you need to work out your own creative process in order to choose the furniture and storage solutions that are best going to compliment your own style.
Considering these things were essential to the creation of my workspace:
- open vs closed storage units
- open vs closed containers
- a desk vs a workbench
- vertical vs horizontal paper storage
- a colour scheme that inspires you

I hope that I have helped you to consider some alternative options for organising your own creative workspace! It doesn't have to be an expensive project, just carefully choose a few big items that are going to be the best fit for your needs, and let your creative juices do the rest :)
Read more about our Study Makeover here.


1 comments:
Fantastic! Very jealous - but so many ideas I am going to borrow :-)
I would love for you to link up at the Mommy Archive. We're focused on craft rooms and cupboards this week but you can also link up your fab old posts on all sorts of other craft, home, food and parenting topics Alice@ Mums Make Lists x
Post a Comment